
Project Summary (Build II)
During this tutorial for Build II, we will complete the end-to-end game for Level 1 of Peg Puzzle — adding the full set of game objects (tabletop, pegs and pegholes), expanding the controller to accommodate game setup, building routines to handle player actions for moving the pegs, jumping other pegs and also removing a jumped peg from the game board. Additionally, during this build we’ll include procedures to accommodate several unique game conditions: (a) error-prone actions, such as multiple clicks on a peg – or – selecting an invalid jump move, (b) selecting a jump path when multiple jump options are available and (c) at the end of each move – determining if there are still any other potential moves that the user can make – if not, ending the game.
I: PEG PUZZLE - BUILD II
Adding Game Objects & Game Control for Level 1
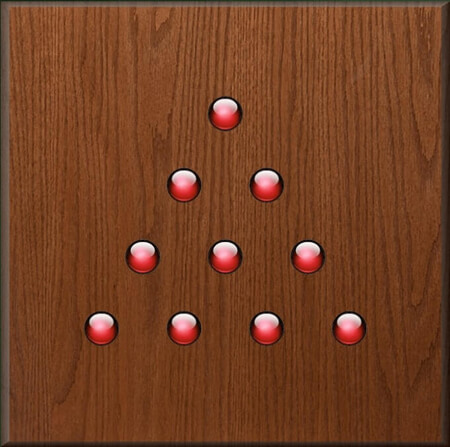
Our next iteration in building a Peg Puzzle game will be to construct all the Defold components needed to support Level 1 game play. During Level 1, the peg game is focused on a geometric shape based on 10 peg holes, similar to the following.
To accomplish that, we’ll be adding some new images, developing game object prototypes for both the pegs and the peg holes, adding a cursor game object and extending our script files to facilitate the necessary game mechanics. The ideal game objective for Peg Solitaire is to continue to jump over pegs (eliminating them) until there is only a single peg remaining on the game board. That can be a challenge, so this game will count and display how many pegs are remaining throughout the conduct of play – and will end when no further moves are possible. For future reference, we’ll consider a level completed when there are only 1 or 2 pegs remaining on the board.
Here’s what the final Build II Peg Puzzle looks like:
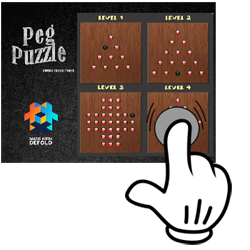
It’s actually starting to look like a game! Also — the addition of animations for both game objects and gui nodes adds to the overall look & feel.
BUILD II PROJECT FILES
Here’s the full project for Build II within a zipfile. As we did in the previous tutorial, I’d recommend downloading and extracting the files into a work folder, then opening it up using the Defold Editor (v2) in order to follow along with the walk-through of the structure of this initial build.

II: PEG PUZZLE BUILD II: DESIGN HIGHLIGHTS
Three Major Design Themes
I have focused on three major design themes that have been incorporated into this project – as listed below.
- GEOMETRICALLY BASED GAME OBJECT LOCATIONS – Within the Peg Puzzle game, all the game objects related to both the pegs, and the pegholes are placed on the gameboard based upon pre-defined geometries – unique geometries for each of the levels.
- DEFINED PATH BASED GAME OBJECT MOVEMENT – Consistent with the basic rules of the game, when a peg is moved, it can only follow a specific set of pre-defined movement paths..
- SPAWNED GAME OBJECT CREATION, RETENTION AND DELETION – Each game object in this game is spawned during level setup, the ID of the game object is retained in a table, and the game objects are all deleted upon the completion of a level.
Geometrically Placed Game Objects

In this build of Level 1 of the Peg Puzzle game – the geometry for the game board is based on that of an equilateral triangle, with a total of 10 locations. As an example, the triangle comprised of locations 1, 2 and 3 equates to an equilateral triangle; the entire 10 hole pattern is also an equilateral triangle. That length of the triangle’s side between adjacent peg locations is set as the variable a. Simple geometry then provides us a formula for determining the height of the triangle which is represented by the variable h – and can be computed as shown in the following illustration.
Within the source code in the file controller.script – you’ll see that the locations of each of the peg positions is represented by two tables:
which are initialized in that script.
Importantly, there are no physics applied to any of the game objects in this game – the position of a peg or of a peghole will always be consistent with one of the locations identified in this illustration.
Location Based Movement Paths
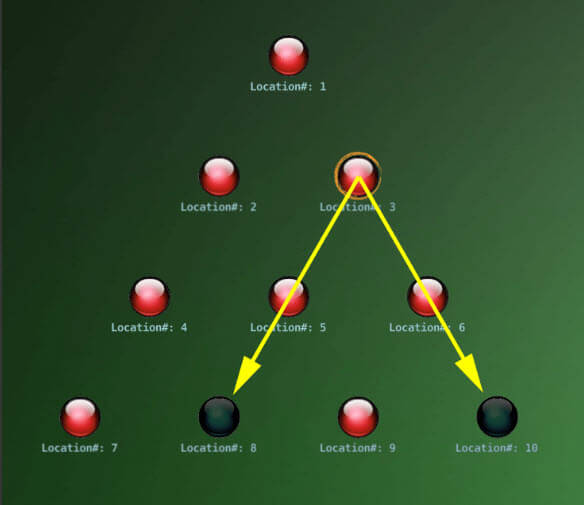
Given these pre-defined locations – we can now define each of the possible paths that a peg can take in jumping – based on the location where the peg starts. For example, if a peg is located at location 3….there are two possible moves: (1) starting at location 3, jumping over a peg located in position 5 and landing in position 8, or, (2) starting at location 3, jumping over location 6 and landing in location 10. Of course, if the middle location doesn’t have a peg in it, or if the landing position already contains a peg – then that possible move would be invalid.
Within the source code in the file controller.script – there are three tables that enumerate each of these possibilities for each of the ten starting points. Notice the two paths we defined earlier as the example for starting location 3 are in the table.

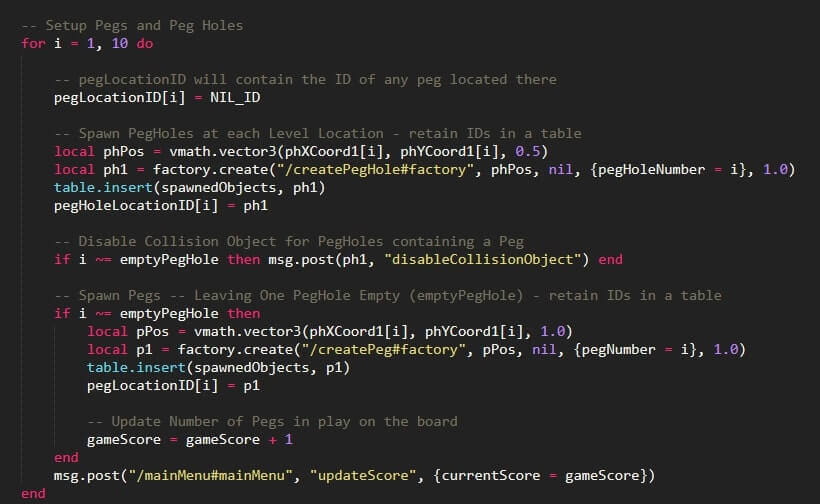
Game Object Spawning/Retention/Deletion
I have found that for a game similar to this one – the most simple and efficient way to manage game objects is to: (1) create a prototype for the game object, (2) spawn them, using factory.create, when you are setting up a game level, retaining key information about them within an attribute table, (3) retaining the id’s of each of these game objects in a table for in-game lookup/reference, and (4) deleting all the game objects at the completion of the level.
Within the controller.script – you’ll see that a table is defined to contain the id of each generated game object.

Within this script, we also will capture the location of each peg and pegHole using the same grid locations we discussed above. For locations 1 to 10,
These tables are set up as follows.
Both pegLocationID and pegHoleLocationID will be useful in determining the location of the cursor when the user touches the screen.
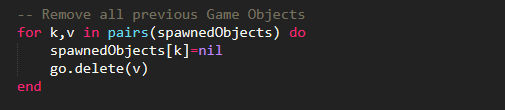
Finally, when the player completes a game level – one of the important functions in this approach will be to delete all spawned game objects – in essence, clear them out to create a clean slate for the setup of the next level. This is accomplished as follows:
III: BUILD II: PROJECT DEVELOPMENT
Now that we’ve introduced the design constructs that really drive the structure of the overall project – we’re ready to start developing Build II — working through the following key steps in enhancing what was developed in the previous Build I tutorial project:
- Addition of new Images: – Level 1 requires the addition of several new png images, to include, orangeRing, peg, pegHole, redGlossyBall, startGame and TableTop. The full set of images is now split between two Atlases (graphicAssets & textAssets) in order to ensure a size of no more than 2048 x 2048.
- Creation of a new Custom Font: – I’ve added a new font for this build – chunky_chalk. It’ll be used for both the gamescore and the game notices.
- Inclusion of a pegPrototype and createPeg Factory: – The set of pegs for this game will be spawned by the createPeg Game Object (and its factory component). The pegPrototype consists of a collision object with sphere shape, a sprite and script. I’ve also included a label which will display the ID of the peg (which can be toggled on/off) – used for debugging.
- Inclusion of a pegHolePrototype and createPegHole Factory: – The full set of peg holes for this game will be spawned by the createPegHole Game Object (and its factory component). The pegHolePrototype consists of a collision object with sphere shape, a sprite and script. Similar to the peg, I’ve included two debugging labels for the peghole game object – one for the location on the board (1 through 10) and the other with the Game Object ID for each peg hole.
- Addition of a cursor Game Object: – The cursor game object and its underlying collisionobject component is what will enable us to determine when the user is touching a peg or a peghole.
- Addition of a TableTop Game Object: – I’ve kept the tabletop as a separate Game Object – to provide some flexibility (as compared with the game background).
- Graphic User Interface Enhancements: – This build includes three new GUI nodes to the interface: (1) a game score which displays the current number of remaining pegs, and (2) a user notice which displays status information to the player, and (3) a play again button, which is displayed at the end of each game, allowing the user to restart.
Project Setup
There are no changes to the game.project file developed in Build I (with the exception of the Project Title) – nor to the custom.render file.
New Font
The chunky_chalk font has been added to this project. This is a free font downloaded from 1001freefonts.com.
New Images and Revised Atlas Configurations
When you open up the Build II project folders – you’ll see several new images. Given the number of total images now needed for the project, they have been allocated across two atlases as illustrated in the following figures (graphicAssets.atlas and textAssets.atlas). Please note the addition of several Animation Groups to the atlas in addition to the images.
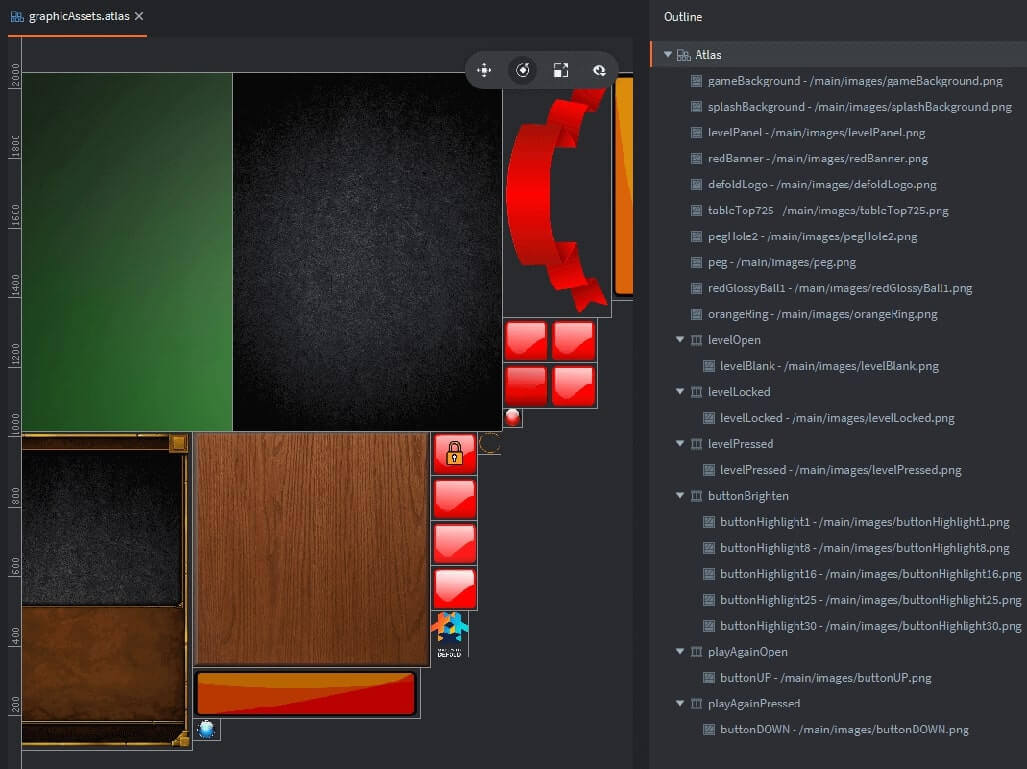

Image Attribution
Attribution: The images added during this build of the project are free assets provided by the following sources: (1) redGlossyBall – psdGraphics.com, (2) orangeRing – pixabay.com, (3) tabletop – pngarts.com, (4) lock – clipartmax.com and (5) pegHole – psdGraphics.com
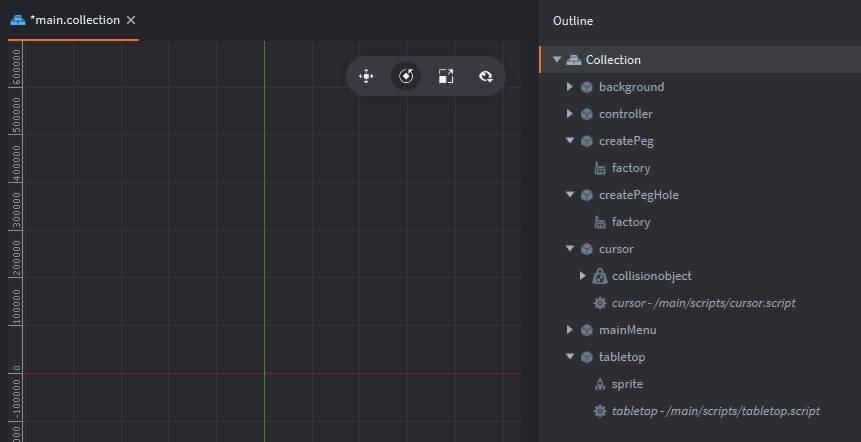
Main Collection
The main.collection is the only collection in this project – keeping the project structure pretty straight-forward. It contains game objects for the background, tabletop, controller, cursor — and game objects to contain the GUI, two factories (pegs and pegholes).
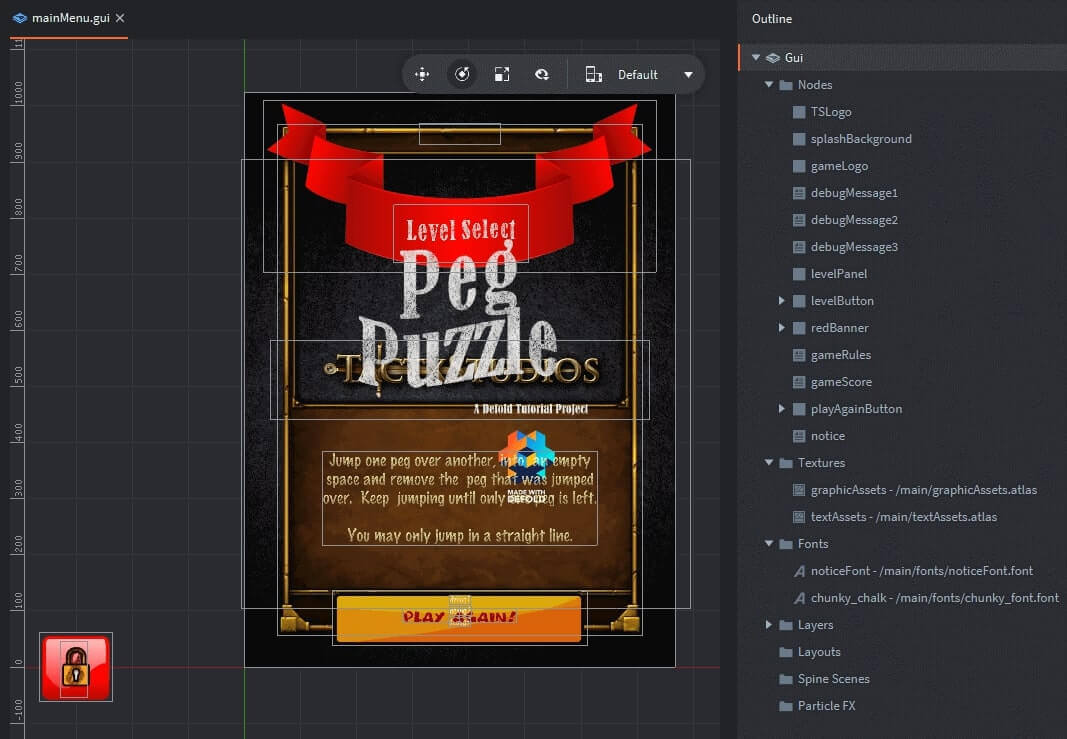
Main Menu GUI
The mainMenu.gui supports both nodes for the introductory splashscreens, as well as nodes for the level selection panel/buttons, game notices, a playAgain button and the game score. Both the textures and fonts we created are also referenced.
IV: BUILD II: SCRIPT ENHANCEMENTS
controller.script
The controller.script for Build II of Peg Puzzle performs several important primary functions:
- The sole location which defines each of the GLOBAL variables used in the project
- The initialization of the level peghole location tables and the valid move tables
- Key functions include: (1) setupPegs, (2) setNextMove, (3) processTouchedPeg, (4) removeHoppedPeg, and (5) processTouchedPegHole.
- Message processing of msgs: (1) splashComplete, (2) startSelectedLevel, (3) playAgain, and (4) cursorTouchedPeg_PegHole.
I’ve included a copy of the source code below – with detailed commenting to assist in better understanding it.
mainMenu.gui_script
Similarly, the mainMenu.gui_script is a derivative of previous projects – within this Build II, we ensure this script performs the following functions:
- Set script properties for each of the GUI nodes as a means to improve overall game performance
- Generate each of the Level Selection Buttons by conducting a gui.clone_tree on a template button
- Enabling/disabling GUI nodes to ensure they are hidden/shown at appropriate times
- A function to support resetting the Level Selection Panel (to include banner, buttons and ruleset)
- Input processing to support touching of a level selection button, and touching of the playAgain button
- Message processing to accommodate msgs: (1) splashComplete, (2) window_dimensions, (3) updateScore, (4) gameOver, and (5) onePegLeft
- The update function displays DEBUG_MESSAGE notices – and can be disabled by setting the global variable BYPASS_DEBUG to true
I’ve included a copy of the commented source code below:
cursor.script
The cursor.script is also a derivative of previous projects – within this Build II, we ensure this script performs the following functions:
- Upon a collision_response (when no other collision is being processed), it passes a msg to the controller related to cursorTouchedPeg_PegHole.
I’ve included a copy of the commented source code below:
peg.script
The peg.script is a component file to each of the peg game objects. It performs the following functions:
- It sets the text for a label supporting debugging
- Message processing of msg: hidePeg
I’ve included a copy of the commented source code below:
pegHole.script
The pegHole.script is a component file to each of the pegHole game objects. It performs the following functions:
- It sets the text for a label supporting debugging
- Message processing of msg: (1) showOrangeRing, (2) hideOrangeRing, (3) showPegID, (4) disableCollisionObject, (5) enableCollisionObject.
I’ve included a copy of the commented source code below:
tableTop.script
This script performs the following functions:
- Message processing of msg: (1) showTableTop, and (2) hideTableTop.
I’ve included a copy of the commented source code below:
IV: COMPLETION OF BUILD II
We’ve come a long way in building this Peg Puzzle game – a full level is now completed, and the game mechanisms to be applied for the rest of the levels have been developed. Go ahead and move onto Build III to proceed with the project’s development. Please let me know if you have a question on any aspect of this tutorial – just drop me a note in the comment box below. I’ll get right back to you. Also – let me know if you find these tutorials helpful. I look forward to your feedback.
At this point, I’m sure you’ll want to proceed to the final posting in this series: Part III.
All the best - Dave
Go to Part 1 Go to Part 2 Go to Part 3