
Objectives for this Tutorial
This tutorial will expand on the basic game object procedures we reviewed in the previous posts and will explain several key procedures that will be frequently used in the development of game applications, to include:
- Developing a script which will invoke a Game Object ‘Factory’ – a function that will spawn additional instances of a Game Object Prototype into the application;
- Developing a script associated with the cursor which will enable a player to select a specific game object displayed within the game world; and
- Leveraging Defold features, we’ll craft a game object script which will facilitate the dragging of a game object to a new position within the game world and dropping the game object at this new position.
NEW - YouTube Version of this Tutorial is now Available
There is now a video version of this Drag/Drop Procedures Tutorial available on YouTube - please take a look and let me know if you find it helpful. Please note, there may some minor differences between the video vs written tutorials, but the techniques are consistent.
I: INITIAL PROJECT SETUP
Modify game.project Parameters
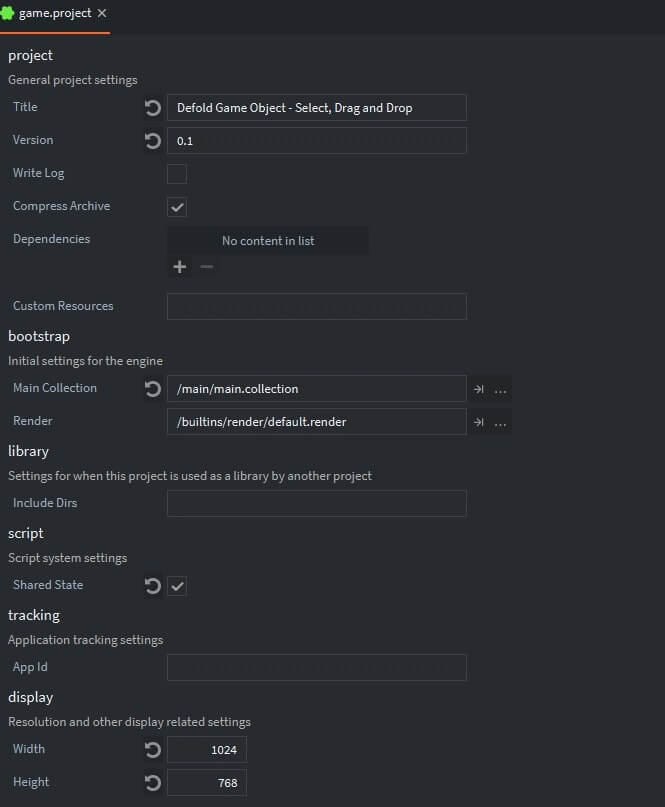
Starting with the Defold Game Template introduced in Tutorial #1 – there are several initial steps required to setup this example’s project. Initially, I edited the game.project file to reflect a new project title and display resolution as highlighted below. I’m using a 1024 x 768 resolution as my default — having a 1.333 Aspect Ratio. Please note that I’ve also checked the “Dynamic Orientation” — this will enable to application to display properly on mobile devices when the user rotates the screen.
Upload Image Files to the Project and Create an Atlas
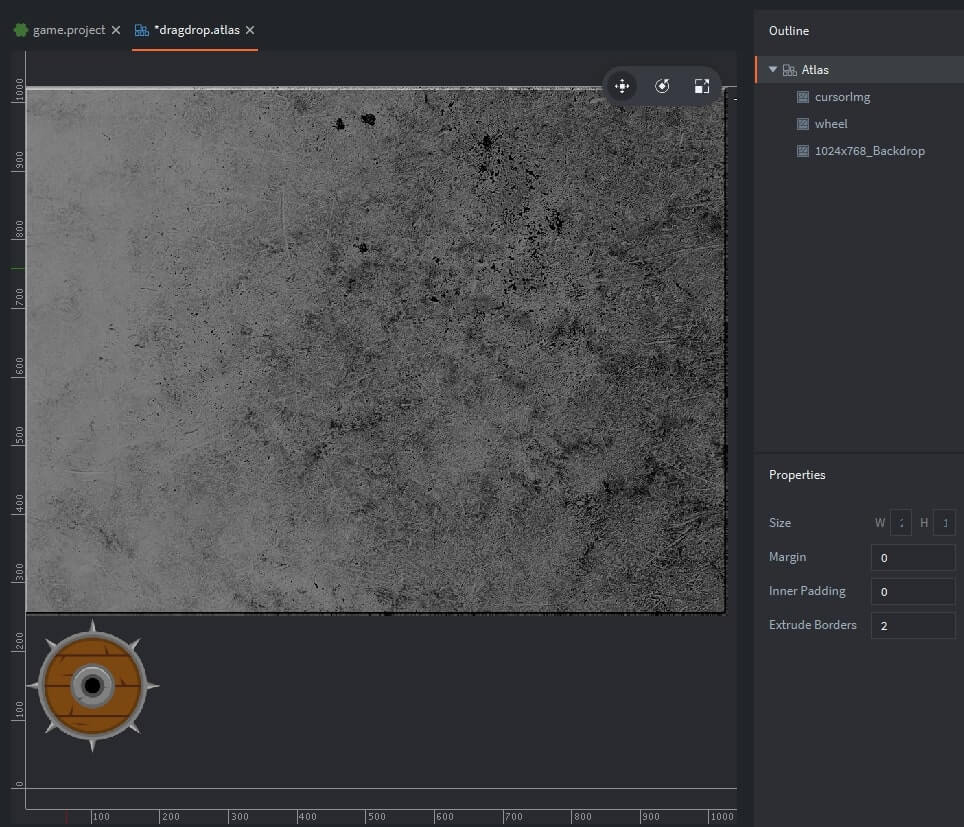
I’ve creating a new folder under the ‘main’ folder titled ‘images’ and added a set of png image files into this new images folder: (a) an image of a wheel, which is the image we’ll be dragging and dropping around the screen, (b) a small cross-hair image which will be displayed at the current cursor location and (c) a background image. These images can be downloaded by clicking the following button.

After the .png files have been added to the image folder within the Project Explorer, we’ll need to create an Atlas file as follows:
- Within Project Explorer: you create a new Atlas file (right click ‘images’ | select ‘new’ | select ‘Atlas’ | pick name for Atlas file (I’ve named it dragdrop) | double-click the new Atlas file just added to the Project Explorer; then
- Within the Outline Window: right-click ‘Atlas’ | select ‘Add Images’ | pick the new .png files to add them to the Atlas
Don’t forget to set the Extrude Borders parameter to 2 — to avoid image bleeding issues.
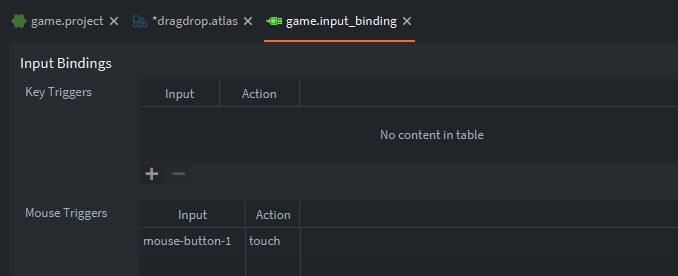
Create Input Bindings for Left Mouse Button/Touch Gesture
Another initial setup task is to establish input bindings to enable the application to recognize mouse and/or touch actions. Double-click the ‘game.input_binding’ file within the Project Explorer (under the ‘input’ folder) to display these options in the Scene Editor. Under ‘Mouse Triggers’, add an input ‘mouse-button-1’ and enter an action of ‘touch’. This is illustrated below:
II: BACKGROUND FOR THE GAME
Create Background Game Object
I prefer every application to have a background (or multiple backgrounds) to add to the aesthetics of the application. For this example, we’ll keep it simple and just add a Game Object to main.collection which includes a sprite containing a background .png image file.
With main.collection in focus within the Outline Window:
- Right-Click ‘Collection’ | Select ‘Add Game Object | in the Properties Window, rename this Game Object (I’ve renamed it: ‘background’)
- Right-Click ‘background’ | Select ‘Add Component | Select ‘sprite’
- Within the Properties Window: designate the Image as ‘dragdrop.atlas | designate the Default Animation as ‘1024x768_Backdrop’
- Within the Properties Window: designate the Position X as ‘512’ and the Position Y as ‘384’ to center the background on the screen
The properties window should look similar to the following:
III: GAME OBJECT PROTOTYPE
Create a Wheel Prototype Game Object - wheelGOPrototype
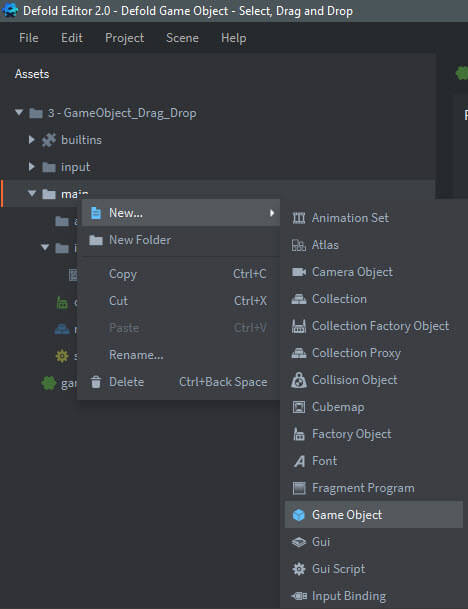
The ‘factory’ component is used within Defold as the means to generate (spawn) a set of similar game objects into a running game. Importantly, the factory feature requires a prototype game object as the blueprint for all the new game objects it will generate. In setting up a prototype for this example, the first step is to create a wheel game object file, as highlighted in the following screenshot – this will serve as the basis for this prototype. Once the GameObject option is selected, you’ll have an opportunity to name this prototype, I’ve used the name ‘wheelGOPrototype’.
Adding a Sprite and Collision Object to the Wheel GO Prototype
Our next step is to add a sprite component to the wheelGOPrototype. With focus on wheelGOPrototype, within the Outline, right-click GameObject | select AddComponent | select Sprite. Within the properties window, set the image to our dragdrop atlas and set the Default Animation to wheel.
To complete the wheel prototype, we’ll need to add two additional components: (a) a collision object which will detect when the cursor is over a spawned game object, and (b) a script file – which I’ve included to enable animation of the wheel objects.
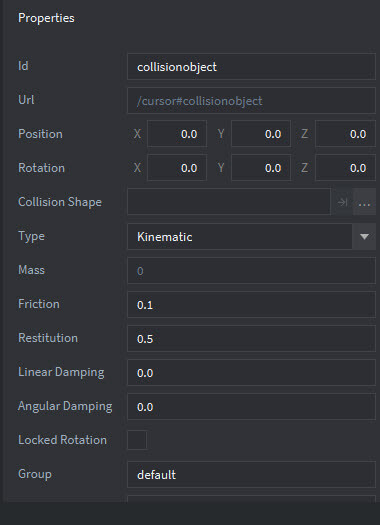
In order to support determining if a user cursor or touch input location coincides with a specific Wheel Game Object, we are going to add a Collision Object to the wheelGOPrototype. With the wheelGOPrototype.go file in focus within the Outline Window, right click it in the Outline | select ‘Add Component’ | ‘select ‘Collision Object’.
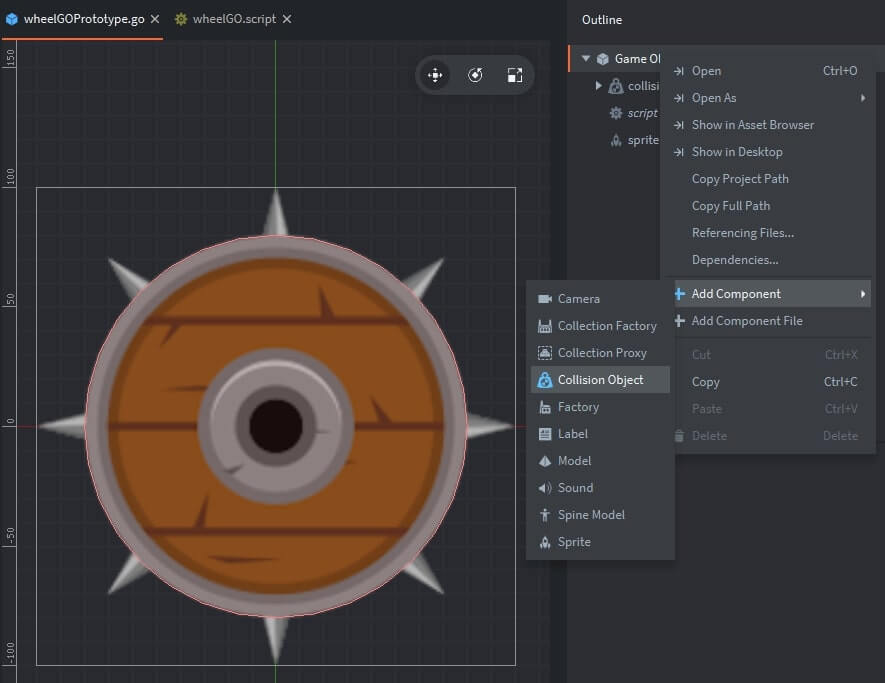
Once the collisionObject has been added to the wheelGOPrototype (Game Object), within the Properties Window, you need to change the Type of this collisionObject to ‘Kinematics’. The Kinematics collision type enables the application logic (within a Lua Script) to control it, without being affected by other physics effects, such as real-world gravity, etc.
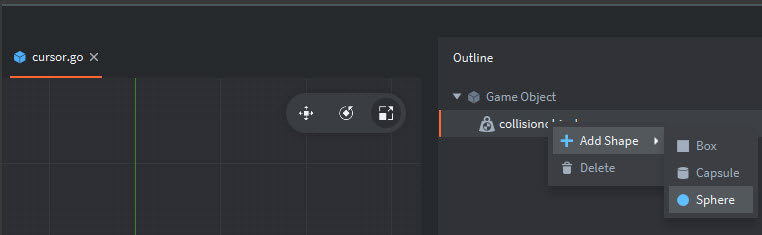
Finally, add a shape to the collisionObject by: right-click ‘collisionObject’ in the Outline Window | select ‘Add Shape’ | select ‘sphere’.
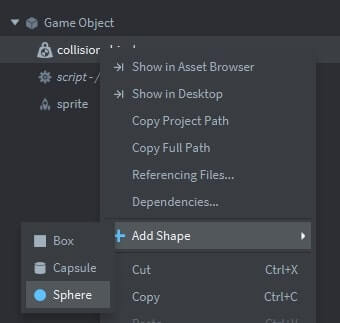
At this point, you can change the size of the collision sphere within the Scene Editor as shown below using the sizing and positioning features of the Editor. I’ve set the diameter to 160 for this example.

Adding a Lua Script to the Wheel GO Prototype - wheelGO.script
To add some animation to this app, I’ve added a script file to the Wheel GameObject Prototype. The following logic will enable rotation of each of the spawned wheels around the z-axis.
Now that we have a Lua Script File within our Project Folder -- we need to add this script to the Wheel Game Object Prototype. To do that, with wheelGOPrototype in focus within the Outline Window:
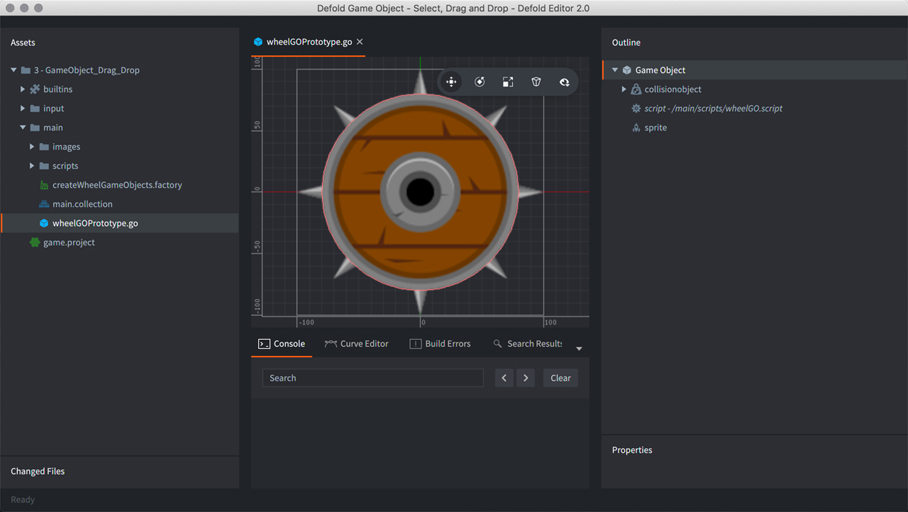
Right-click ‘Game Object’ | Select ‘Add Component File’ | Select ‘wheelGO.script’. The screenshot below shows what your final Wheel Game Object Prototype should look like.
Now that the prototype is complete, the next step is to set up a Defold Game Object which has a Factory Component as the means for creating multiple wheels within the game screen.
Syntax Highlights
factory.create triggers the creation of a Game Object using the following syntax:
- [name] – The id of the property
- [value] – The default value of the property
- [url] – The url is a reference to the game object, in Defold, ‘.’ refers to the self;
- [property] – second parameter is the property identifier of what will be animated, in this case the rotation of the wheel;
- [playback] – third parameter provides the playback mode – in this case, we’re using a loop mode (the animation runs forward on a loop);
- [to] – The ‘to’ parameter is the target property value, in this case – a rotation of angle (-1.57) in radians around the z-axis;
- [easing] – The ‘easing’ parameter defines how the animated value will change over time. This is explained in detail within the Defold Animation Manual.
- [duration] – Lastly, we’re setting the duration of the rotation to the script property defined – self.speed;
IV: THE FACTORY COMPONENT
Creating a Game Object as Host of the Factory
At this point, we have created a prototype for a Wheel Game Object (which includes a Collision Object, a sprite and a script); but, we now need to create a means to spawn instances of this wheel. Our first step will be to create a new Game Object — which will ‘host’ a Factory Component which we’ll be adding shortly. This is done as follows:
First, double-click the ‘main.collection’ folder in the Project Explorer which will then serve as the starting point for the outline. Within the Outline window, right-click ‘collection’ and select the ‘Add Game Object’ menu item – renaming it to ‘createWheelGameObjects’ within the Properties Window.
Add a Factory Component to the 'Hosting' Game Object
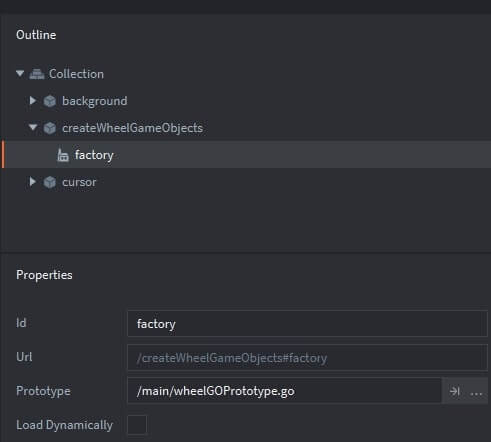
Once the ‘hosting’ Game Object has been created, you can add a factory component right within the Outline Window — right-click ‘createWheelGameObjects’ | selecting ‘Add Component’ | and selecting ‘Factory’.
Within the Property Window, you’ll need to identify the Prototype for this factory (wheelGOPrototype.go) as depicted below:
Adding a Lua Script to the 'Hosting' Game Object - spawnWheels.script
Our next step will be to create a script file which will control the spawning of multiple wheels using the factory feature created in the previous step. Within the ‘main’ folder of Project Explorer, create a new script file named ‘spawnWheels.script’. This is the Lua code that will generate a set of wheels within the game world. As seen below, within the init(self) function, two primary tasks are performed: (1) the width and height of the game world are determined as a basis for determining legitimate positioning for both x and y, and (2) a set of ten wheel game objects are created, spawned at random locations within the screen.
Syntax Highlights
Several new functions are introduced in this example, to include:
- As described in Defold Documentation, this function returns a string value from the game.project configuration file, in this case the display width and height.
- This function converts the argument to a number.
- As described within Defold Documentation, this function creates a new three dimensional vector, using a three-dimensional coordinate as its basis: [x] – The x coordinate; [y] – The y coordinate; [z] – The z coordinate
- [url] – The id of the factory component that should spawn a new game object.
- [position] – (optional) The world position of the new game object. This should be a vector3. If you do not specify a position, the game object is spawned at the position of the factory component.
- [rotation] – (optional) The world rotation of the new game object. This should be a quat.
- [properties] – (optional) A Lua table with any script property values to initiate the game object with. See the Script property manual for information on script properties.
- [scale] – (optional) The scale of the spawned game object. The scale can be expressed as a number (greater than 0) which specifies uniform scaling along all axis. You can also provide a vector3 where each component specifies scaling along the corresponding axis.
V: CURSOR GAME OBJECT
With the Wheel Prototype completed and the factory for spawning multiple wheel game objects in place, the last major step is creating a Game Object to reflect the cursor (either mouse cursor or finger touch position). This is an important feature in that it determines if the user has selected a GameObject and whether the user is dragging that GameObject to a new location on the screen.
Create a Cursor Game Object and a Collision Object Component
Double-click the ‘main.collection’ within the Project Explorer to place it in focus within the Outline Window. Within the Outline Window, right-click ‘Collection’ to add a Game Object; I’ve named it ‘cursor’. Then right-click the ‘cursor’ game object within the Outline Window to add a Collision Object. Within the Properties Window for this new collisionObject, change the Type to ‘Kinematic’ (similar to how we changed the type of the wheelGOPrototype collisionObject. This is shown below:
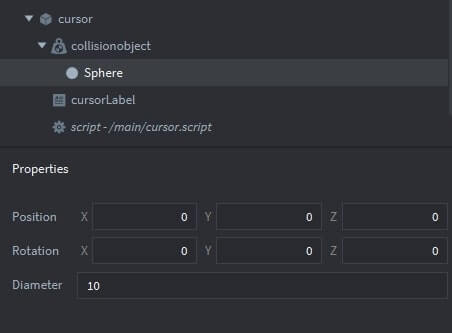
Similar to what we did for the wheelGOPrototype, we’ll add a shape file to the cursor Game Object within the Outline Window. Right-click ‘collision’ | select ‘Add Shape’ | select ‘Sphere’ as shown here:
Also, we’ll change the diameter of the sphere to 10 pixels within the Property Window associated with this Sphere shape.
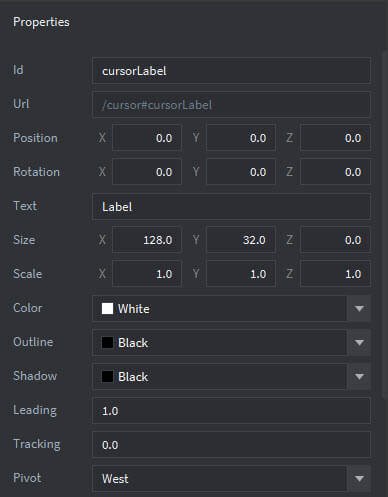
Add a Cursor Sprite and Cursor Label
I’ve decided to add two enhancements to the cursor Game Object — to illustrate features that will be useful in future design and debugging activities — we’ll be adding a sprite to the cursor game object as a means for displaying the cursorImg, and we’ll also be adding a label component which will be used to display the current cursor x/y position.
Adding a label component is accomplished by: right-clicking ‘cursor’ in the Outline Window | selecting ‘Add Component’ | selecting ‘Label’ | name the component as ‘cursorLabel’.
Once this is accomplished, you can left-click ‘cursorLabel’ and modify its properties – in particular, you can change it’s relative positioning as compared with the cursor location under the ‘Pivot’ attribute. I’ve elected to place the cursor to the ‘west’ (left) of the label.
VI: ADDING A CURSOR SCRIPT
Create a Script File in the Project Explorer
The final step is creating a script file which will control application actions based on user input which change the location of the mouse cursor and mouse button_1.
We’ll add a script file to the ‘main’ folder within the Project Explorer by: right-clicking ‘main’ | selecting ‘new’ | selecting ‘script’. We’ll name this script file: ‘cursor’.
The following Lua code should be copied and pasted to replace the standard template code that the Defold Editor 2 places within a new script file.
The syntax for this script is shown below and contains internal comments that highlight several key game patterns within this module.
Syntax Highlights
There are a few important elements within the syntax that merit additional explanation, these explanations are extracted from Defold Manual/Message Passing documentation.
The on_message function takes three parameters (in addition to ‘self’ which contains a reference to the game object itself.
- [message_id] - Contains the name of the message — the name is hashed.
- [message] - Contains the message data — this is a Lua Table
- [sender] - Contains the full URL of the sender
This message is broadcasted to every component of an instance that has a collision object, when the collision object collides with another collision object. For a script to take action when such a collision happens, it should check for this message in its on_message callback function. This message only reports that a collision actually happened and will only be sent once per colliding pair and frame. To retrieve more detailed information, check for the contact_point_response instead.
- [other_id] - hash the id of the instance the collision object collided with
- [other_position] - vector3 the world position of the instance the collision object collided with
- [group] - hash the collision group of the other collision object (hash)
This function retrieves the global world position of the game object identified in the parameter
- [id] - the string | hash | url id of the instance to get the position for; the default is the instance of the calling script
- [returns] - this function returns a vector3 instance position
Since the cursor game object has acquired input focus, user input is captured by the Defold game engine and dispatched as actions to this function.
- [action_id] - The name of the message, as set up in the input bindings – this name is hashed.
- [action] - A Lua table which contains the message data — for example: (a) action.pressed — this is set to ‘true’ during the first frame within which the input was detected, otherwise it is ‘false’; (b) action.repeated — this is ‘true’ if the input was repeated, otherwise it is ‘false’; (c) action.released — this is set to ‘true’ in the frame in which the input was released, otherwise it is ‘false’
Returns the time in seconds – you should subtract values returned by this function to get meaningful results
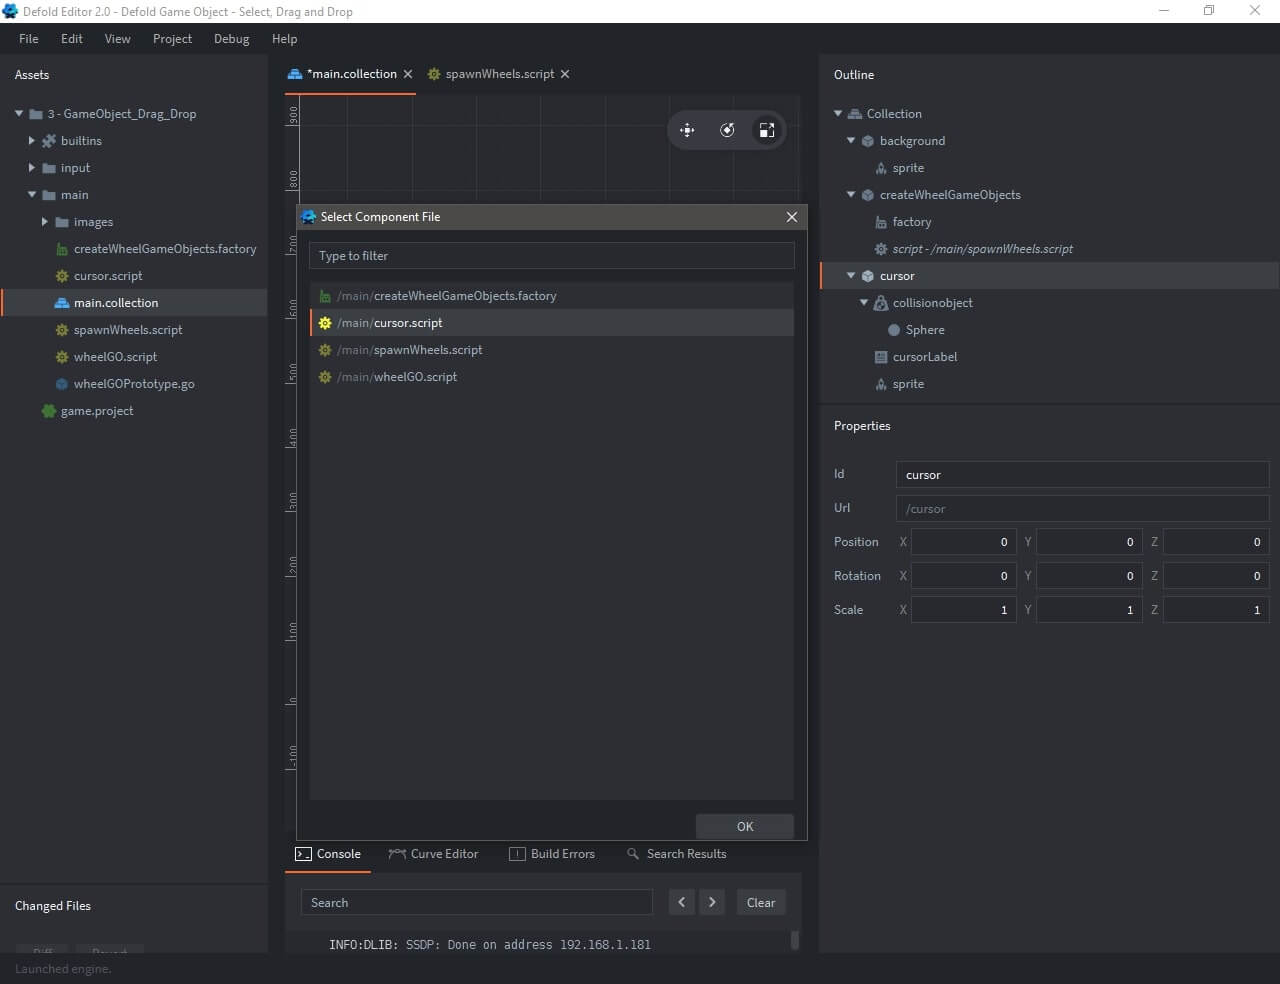
Add cursor.script to the Cursor Game Object
Once cursor.script has been saved within the Project Explorer, you can add the script to the cursor Game Object within the Outline Window, as follows.
To close out this 3rd Tutorial, I have included the full project within a zipfile which can be downloaded by pressing the following button.
VII: THE FINAL OUTCOME
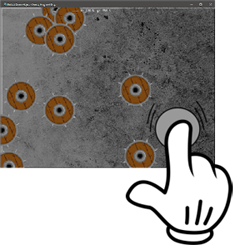
This completes the project for this third tutorial, illustrating several key Defold features, to include: (1) implementation of collision objects, (2) setting up input bindings, (3) use of messaging, (4) the incorporation of labels associated with game objects…and the manner in which you can implement a simple game object ‘drag and drop’ feature. At this point, after being built, this tutorial’s project is complete. The following iframe provides an inline working version which highlights the Defold features discussed in this post:
Active Defold Application - Click the Thumbnail Icon below
VIII: TUTORIAL WRAP-UP
I hope you found this tutorial to be useful. If you have any questions on this tutorial -- drop me a note in the comment box below. I'll get right back to you. I look forward to your feedback.
All the best - Dave