
Project Summary
Who doesn’t like to play the Peg Triangle (aka, Peg Solitaire) game? That’s the focus of the next series of Defold Game Tutorials. I’m going to divide the content of this project over a series of three tutorial postings — I think that’ll be easier for everyone in working through the entire project – keeping each post down to a reasonable length. I’m also using this approach to highlight the sequential build process that I’ve found helps me in more efficiently creating Defold Game projects, with early feedback related to the look & feel of the game and the elements of game play. By running through a sequence of executable smaller builds – I’m finding far fewer design challenges, as well.
So – the Peg Triangle game for those not familiar with it is pretty simple. There are pegs located in a series of peg holes (either in a triangle, or other geometric shape) — but at the start of the game, one peg hole doesn’t contain a peg. The object of the game is to jump one peg over another, into an empty space and remove the peg that was jumped over. Keep jumping until only one peg remains — but, you can only jump in a straight line.
Here’s a video of a simple peg game, in action.
I: PEG PUZZLE - GAME PROJECT OVERVIEW
This series of three tutorials will use the development of a traditional peg game to highlight an approach for game development — using sequential builds. Each build is a fully executable project – allowing the developer to build, bundle onto targeted platforms and execute. Hardly an ‘Agile’ process, but what I’d term a ‘blocking and tackling’ plan for rapid game development. I’ve found that the advantage is that at the end of each iteration, I can take a look at what it feels like, adjust as needed and setup some revised design goals for the next round.
- BUILD I: – In support of this initial build, we’ll be outlining the general concept of the game, to include, defining the target audience, setting targets for overall simplicity/difficulty, defining game play and win objectives. Integral to Build I will be the collection of initial graphic assets, to include backgrounds for both the splashscreens and gameplay, logos for the developer and game title, level selection panel and level buttons, game object sprites and animations.
- BUILD II: – During this second tutorial, we’ll expand on Build I – adding a fully functional Level 1 of gameplay. During the tutorial for Build II, we’ll add the full set of game objects (tabletop, pegs and pegholes), expand the controller to accommodate game setup, routines to handle player actions for moving the pegs, jumping other pegs and also removing the jumped peg from the gameboard. Additionally, during this build we’ll include procedures to accommodate several unique game conditions: (a) error-prone actions, such as multiple clicks on a peg – or – selecting an invalid jump move, (b) selecting a jump path when multiple jump options are available; and (c) determining if there are still any potential moves that the user can make – if not, ending the game.
- BUILD III: –The last tutorial will add new play levels to the game – focused on different geometries – each of which will be more challenging to the player. Additionally, I’ll clean up the code where necessary – especially where there’s an opportunity to consolidate common routines into a module that can be applied across all game levels.
As I mentioned earlier, this first tutorial is focused on (a) overall concept development, (b) identification & collection of the initial batch of graphic assets, and (c) development of the basic Defold Game Components related to SplashScreens, the Main Menu and Game Background.
Here's what the final result of Peg Puzzle (Build I) looks like:
Go ahead -- click the following thumbnail.
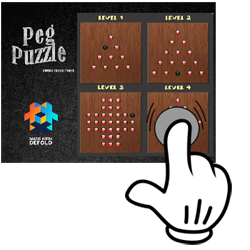
Okay – not all that impressive. But – it does include some standard components that I want the game to have and the selected graphics set the general tone for the game. In addition to the template splashscreen displays, I’ve also included in this Build I a level selection process.
BUILD I PROJECT FILES
Here’s the full project for Build I within a zipfile. I’d recommend downloading and extracting the files into a work folder, then opening it up using the Defold Editor (v2) in order to follow along with the walk-through of the structure of this initial build.

II: PEG PUZZLE BUILD I: PROJECT SETUP
Overview
If you’ve been following my previous tutorials, you’ll quickly realize that this Build I is essentially the same general design as what was included in the splashscreen/main menu components of the IceJump! game….I’ve really only reskinned the graphic assets associated with the game logo, game background, level selection panel, and the level buttons. Yes – Code Reuse is a great thing!!
Project Setup
Within the game.project file – I’ve set several parameters: (1) the game title, (2) setting the render to custom.render and (3) setting the display resolution to width: 768 and height: 1024. I’ve loaded a series of png images and included them within an atlas, custom fonts have been included as well as the same custom render script used in previous tutorials. The game.input_binding reflects a single input: mouse-button-1 as a ‘touch’ event. I’ve also included two lua modules (animationFunctions.lua and fpsUtil.lua)).
Image Attribution
Attribution: All images used in the project are free assets provided by the following sources: (a) splashBackground – publicdomainvectors.org, (b) gameBackground – wallhere.com, and (c ) level selection panel, redButton and redBanner – kisspng.com. The studio and game logos were created using Photoshop Elements 2018.
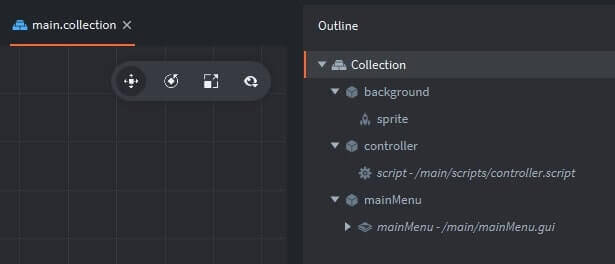
main.collection
The main.collection simply contains Game Objects for the background, the controller and the mainMenu GUI.
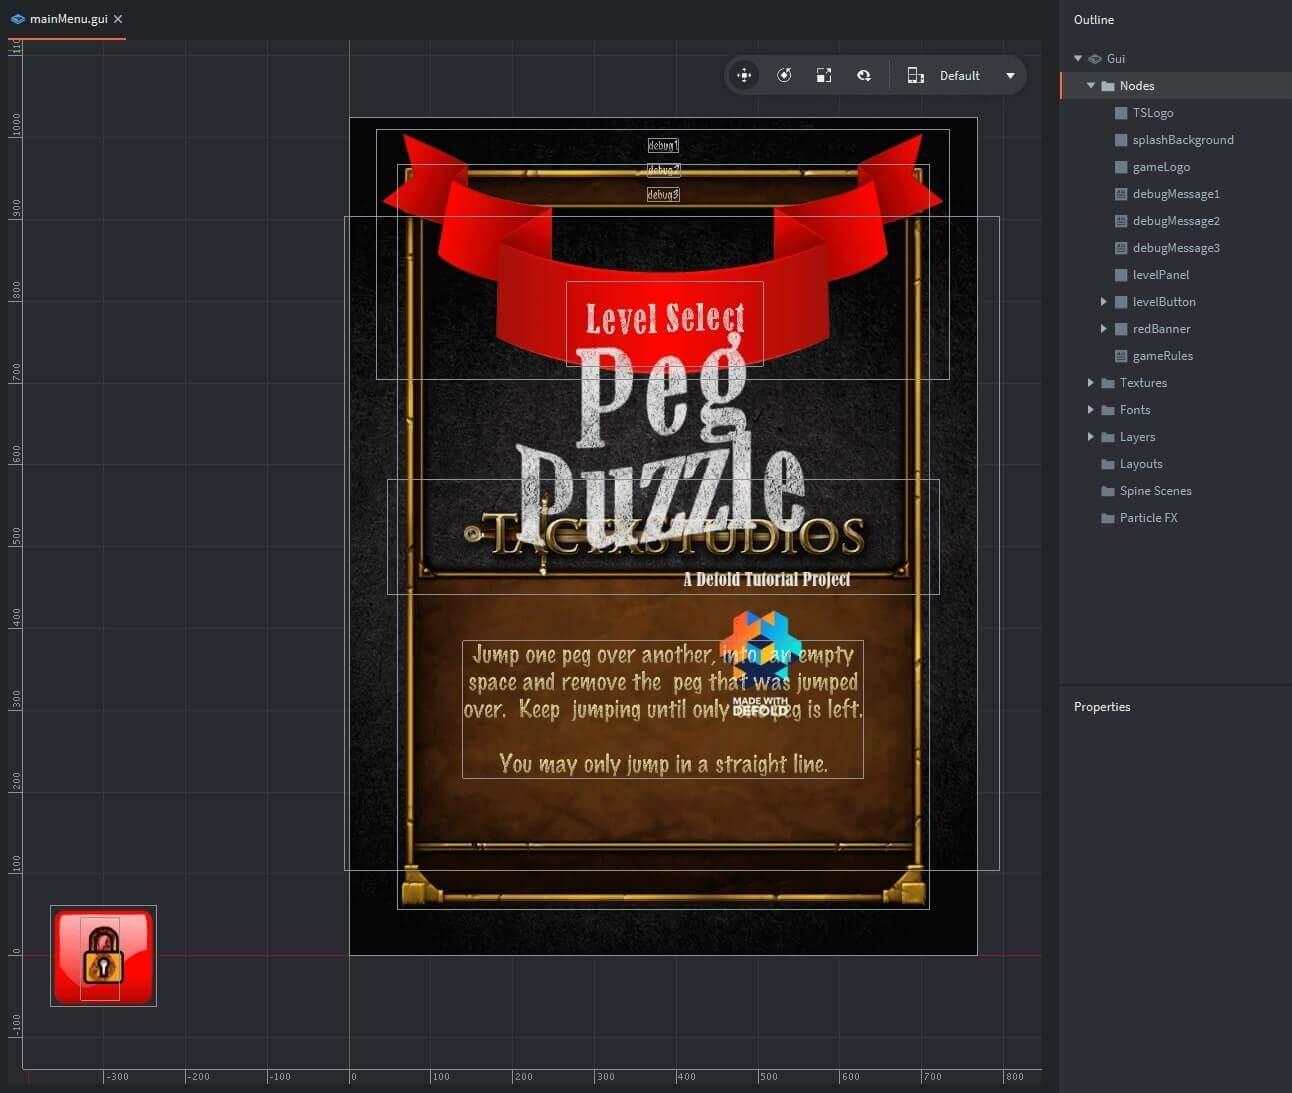
mainMenu.gui
Although it looks totally different – the structure of the mainMenu.gui is also pretty much the same as we used in IceJump! – as can be seen in the following screenshot.
III: BUILD I: SCRIPT HIGHLIGHTS
controller.script
As cited, for this initial build – I’ve highly leveraged the template explained in Tutorial A of this Defold Series. The controller.script for Build I of Peg Puzzle performs two primary functions:
- It declares several GLOBAL variables used for screen control (WINDOW_WIDTH/WINDOW_HEIGHT, BYPASS_SPLASH, DEBUG_MESSAGE1/2/3 and the ACTIVELEVEL).
- This script also contains message handling upon receipt of “splashComplete” and “startSelectedLevel” messages (issued by the mainMenu.gui_script.
I’ve included a copy of the commented source code below:
mainMenu.gui_script
Similarly, the mainMenu.gui_script is a derivative of previous projects – Build I performs the following functions:
- The gui_script invokes animations for both the studio and the game logos.
- It declares script properties for the IDs of each of the GUI nodes (which improves overall game performance)
- It generates the Level Selection Buttons by cloning a GUI node tree (assuming a total of four levels for this game). The gui_script also disables these buttons during game play to avoid inadvertently invoking a level button during gameplay.
- It includes functions for resetting the Level Selection Panel, animating both the panel and a red banner and enabling the level buttons, updating locked levels depending upon which levels the user has successfully completed.
- The on_input function accommodates touching of one of the level selection buttons – changing the graphic image and dispatching a message to the controller when a level is selected.
I’ve included a copy of the commented source code below:
IV: COMPLETION OF BUILD I
Certainly not a game yet – but it does provide a good starting point and a foundation to build upon. I hope my abbreviated descriptions this time haven’t made it difficult to understand. Also – please let me know if you find these tutorials helpful. If you think I should add more detail related to any piece of this tutorial – or if you have a question on how it works — please drop me a note in the comment box below. I’ll get right back to you. I look forward to your feedback.
Next step – you’re now ready to process onto Part II.
All the best - Dave
Go to Part 1 Go to Part 2 Go to Part 3